|
Well since I've seen several posts in
regards to a poorly working e-brake/hand/parking brake - I'm posting this just
to let everyone know I found that my 'way' of adjusting the rear brakes and
parking/e-brake's to significantly improve how well the parking brake/hand
brake works.
Mine stops the car from rolling with 2 clicks up if I'm stopped and on level
ground. And not much further up when rolling/driving which is very nice if I
need it to initiate or mid drift.. No need to use the regular brakes with, drive
the car, weight transfer or anything else, it just grabs really well.
(I'm currently using pbr pads, bradi drilled/slotted rotors. But that shouldn't
matter as far as the adjustment goes. I probably loose some initial 'bite' due
to the loss of braking surface area due to the drilling/slotting on these small
rotors.)
Here's the written steps:
1. Jack up rear of car, remove the rear wheels. Be sure to use jack stands.
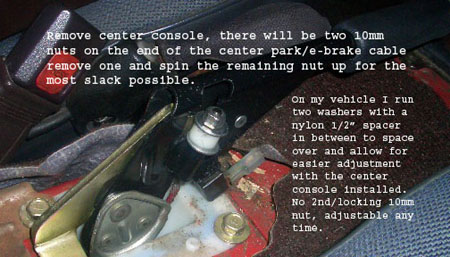
2. Undo the nut on the center cable and get as much slack as possible. (hand/park
brake cable adjustment nut - on my vehicle I removed the top nut so I no longer
need to remove the center console to adjust it, just put a deep 10mm socket down
inside and turn)
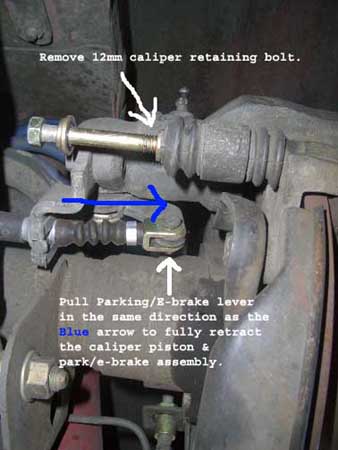
3. Remove the brake caliper retaining/slide bolt on the bottom of the rear caliper.
Rotate the caliper forward and slide back slightly for access.
4. Turn the brake adjuster in at least 1 full turn (more is OK). Make sure to
line up the notch/groove/slot openings on the caliper piston with the pin/tab
on the brake pads. Slide caliper back on and put the bolt in a few threads by
hand. (if this is the first time you've had your rear calipers off go ahead and
turn it all the way down till it's basically flush with the caliper, it wont
hurt anything and helps free up the piston/adjusters)
5. Here's the trick to the adjustment.
A) pull the e-brake cable adjusting lever on the brake caliper towards you so
you KNOW its all the way off. (after adjustment this gives you the most leverage/range
of movement/clamping force)
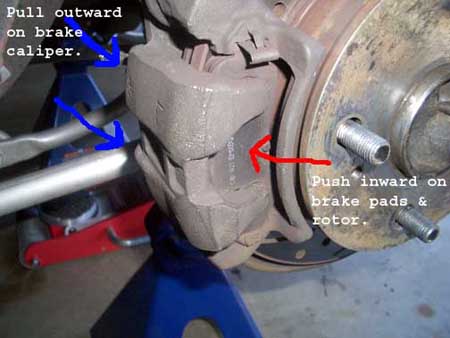
B) Pull the whole caliper assembly towards the outside of the car (towards you)
and push between the caliper fingers on the brake pads inward (away from you)
so space/slack is visible between the rear brake caliper/fingers and brake pad
on the outside.
C) Have someone LIGHTLY flutter the brake pedal so it forces the caliper piston
out a little at a time.
What that will do is force the caliper out little by little and as it comes out
and then back it rotates. The adjuster/opening on the piston will catch the notch
and "auto" adjust the rear caliper correctly. You should have little
to no space left after the adjustment.
6. REPEAT for the other side (can be done one side at a time) & install bolts
for the rear calipers.
7. Reinstall wheels and put back on the ground.
8. Now you can tighten up the nut in the console hand-brake to the point where
about 2-3 clicks up it will stop the vehicle from rolling.
Test drive - even if it doesn't work quite as well as mine it should be significantly
improved.
NOTE: I do have 3 new e-brake cables and a new handle, but it locked up fine
with the old cables as well.
Here's the PHOTO guide which should help all the visual thinkers...
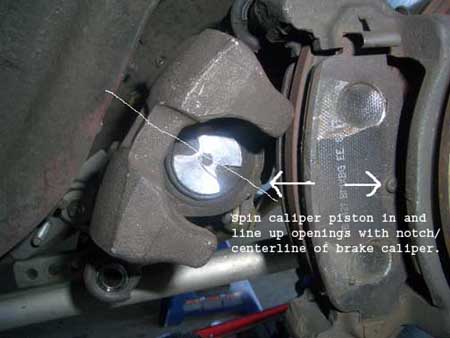
EDIT: It helps if you spin the piston in about 1/8-1/4 turn past the marks where
it lines up and then back it out. Something to do with the design of the adjuster
inside the caliper. Be sure to do so.

Q. Is the SR5 adjusted the same way?
A. No - the sr-5 is a drum brake. The drum brakes have a slot about 3/8" tall
and 3/4" long which you can stick a small flat head screwdriver into and
tighten the shoes inside the drum for good lockup.
It's best to do it in the air with the
tires off, tighten until the brakes start to drag and repeat on the other side.
The adjuster 'clicks' and wont back off if you take it too far.
|